Implementing a HashTable in Rust
Recently, I wanted to revisit Rust, and while following along with the book Crafting Interpreters, I came across the chapter on implementing a Hash Table. I discovered many interesting details about Hash Table implementations, which inspired me to write this blog post. I will implement a Hash Table using Rust and conduct some possibly non-standard benchmarks.
A Hash Table typically consists of two main components:
- A hash function
- A collision resolution strategy, commonly including: a. Chaining b. Linear probing
In our Hash Table, we will use String as the key type and a simple hash function called FNV-1a to compute the hash value. To avoid recalculating the hash value on each query, we will precompute and cache it within the key.
pub struct KeyValue {
    key: Key,
    value: Value,
}

pub struct Key {
    name: String,
    hash: u32,
}

impl Key {
    pub fn new(name: &str) -> Self {
        let mut hash: u32 = 2166136261u32;
        for &b in name.as_bytes() {
            hash ^= b as u32;
            hash = hash.wrapping_mul(16777619);
        }

        Self {
            name: name.to_string(),
            hash,
        }
    }
}

pub enum Value {
    Boolean(bool),
    Number(f64),
    String(String),
}
A Hash Table requires an array as storage space, and it must also keep track of how many entries are currently stored in the array to facilitate space expansion when it approaches capacity.
pub struct Table {
    pub count: usize,
    entries: Vec<Entry>,
}

pub enum Entry {
    KeyValue(KeyValue),
    Tombstone,
    None,
}
The entries array is where the actual data is stored, and each element is an enum with three possible states: the first indicates data is present, the second indicates the data has been deleted, and the third indicates no data exists. A Tombstone is a common technique used to implement the delete operation in a Hash Table. If the Hash Table uses chaining to resolve collisions, the delete operation is straightforward; you simply remove the corresponding element from the chain. However, to reduce the probability of CPU cache misses, we will use linear probing for our implementation.
Unlike chaining, when a collision occurs, linear probing searches the array to find the first available space to store the element. During lookups, if the target key is not found at the desired index, it continues to search sequentially until it encounters an empty element or finds the target key.
However, the delete operation in linear probing is relatively challenging to implement. Imagine if we simply remove an element, it introduces an empty slot, which could break the “chain” of other key lookups. A tombstone provides a solution by replacing the element to be deleted with a tombstone. When a lookup encounters a tombstone, it continues searching, thus preserving the “chain.” When inserting, if a tombstone is encountered, it is simply replaced, avoiding wasting space.
Before implementing insert, lookup, and delete operations, we define a helper function, find_entry, which is responsible for searching for a specified key. If found, it returns the corresponding index; if not found, it returns an index where the key can be inserted. This insertable index may correspond to either an empty element or a tombstone.
enum FindResult {
    Found(usize),
    Available(usize),
    Tombstone(usize),
}

fn find_entry(entries: &Vec<Entry>, key: &Key) -> FindResult {
    let mut index = (key.hash % entries.len() as u32) as usize;
    let mut tombstone: Option<FindResult> = None;

    loop {
        match &entries[index] {
            Entry::KeyValue(kv) => {
                if kv.key == *key {
                    return FindResult::Found(index);
                }
            }
            Entry::Tombstone => {
                if tombstone.is_none() {
                    tombstone = Some(FindResult::Tombstone(index))
                }
            }
            Entry::None => {
                if tombstone.is_some() {
                    return tombstone.unwrap();
                }
                return FindResult::Available(index);
            }
        }

        index = (index + 1) % entries.len();
    }
}
Next, we will implement the lookup operation get. Since we already have find_entry, implementing the lookup becomes very straightforward.
impl Table {
    pub fn get(&self, key: &Key) -> Option<Value> {
        if self.entries.len() == 0 {
            return None;
        }

        if let FindResult::Found(entry_index) = find_entry(&self.entries, &key) {
            if let Entry::KeyValue(kv) = &self.entries[entry_index] {
                return Some(kv.value.clone());
            }
        }

        return None;
    }
}
The insert operation set is a bit more complex than lookup because there might be insufficient space in the array during insertion. To optimize performance, we cannot wait until the space is nearly full to expand it. As the available space decreases, the probability of collisions increases, leading to longer lookup times. Therefore, we define a MAX_LOAD threshold, indicating when the used space reaches a certain ratio, prompting space expansion.
Here, we define another helper function, adjust_capacity, to handle space expansion. Inside this function, we first allocate a larger space and then traverse the original space, inserting existing elements one by one.
impl Table {
    fn adjust_capacity(&mut self, capacity: usize) {
        let mut entries: Vec<Entry> = vec![Entry::None; capacity];

        self.count = 0;
        for e in &self.entries {
            if let Entry::KeyValue(entry) = e {
                if let FindResult::Available(index) = find_entry(&mut entries, &entry.key) {
                    entries[index] = Entry::KeyValue(entry.clone());
                    self.count += 1
                }
            }
        }

        self.entries = entries;
    }
}
With adjust_capacity implemented, we can now implement the set operation. First, we check whether inserting will exceed the load threshold. If it does, we expand the space (I arbitrarily chose a strategy: if the length is less than 8, expand it to 8 directly; otherwise, double the current length). Then, we use find_entry to determine the index where we can insert the key. If Found is returned, it means the key already exists, so we update it; if Available is returned, it means the key does not exist, and there is an empty slot available, so we increment the element count count and insert the new entry; if Tombstone is returned, we treat the tombstone as an existing element and do not increment count. This is crucial because if we do not consider the tombstone as an existing element, when the array is filled with tombstones and no empty slots remain, find_entry could enter an infinite loop.
impl Table {
    const MAX_LOAD: f32 = 0.75;

    pub fn set(&mut self, key: &Key, value: &Value) {
        if (self.count + 1) as f32 > Self::MAX_LOAD * self.entries.len() as f32 {
            let capacity = if self.entries.len() < 8 {
                8
            } else {
                self.entries.len() * 2
            };

            self.adjust_capacity(capacity);
        }

        let index = match find_entry(&self.entries, &key) {
            FindResult::Found(index) => index,
            FindResult::Available(index) => {
                self.count += 1;
                index
            }
            FindResult::Tombstone(index) => index,
        };
        self.entries[index] = Entry::KeyValue(KeyValue {
            key: key.clone(),
            value: value.clone(),
        });
    }
}
With the tombstone mechanism in place, implementing the delete operation becomes quite simple; we just replace the corresponding element with a tombstone.
impl Table {
	pub fn delete(&mut self, key: &Key) {
        if self.count == 0 {
            return;
        }

        if let FindResult::Found(index) = find_entry(&self.entries, &key) {
            self.entries[index] = Entry::Tombstone;
        }
    }
}
Now, we have a complete and functional Hash Table implementation. Let’s perform some benchmarks.
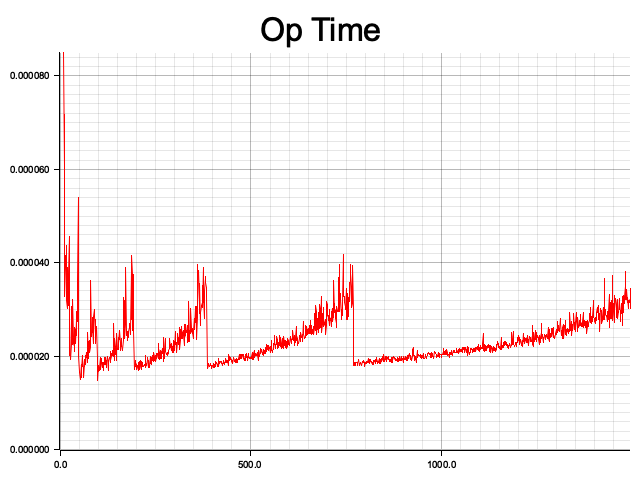
I define an operation that involves inserting a certain number n of elements, then deleting n/10 of those elements, and finally querying n*200 times to calculate the average time taken for each operation.
The results are as follows, where the x-axis represents the number of elements n (from 10 to 1500), and the y-axis represents the average time taken for operations at the current scale. It can be observed that the average time fluctuates in a sawtooth pattern as the scale increases. Each rising segment indicates that, under fixed storage size, the operation times increase as the number of elements stored in the Hash Table increases (indicating more collisions). When the threshold is reached, the space is expanded, and the average operation time drops accordingly.
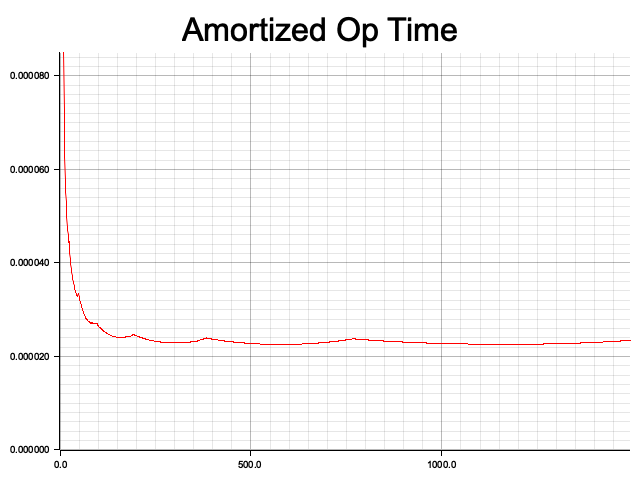
Additionally, I calculated the amortized operation time. Similarly, the x-axis represents the input size, but the y-axis shows the average time taken for all operations up to that point. It can be seen that the amortized time complexity of the Hash Table indeed approaches O(1).
Through this implementation, I gained insights into some unique details of Hash Tables, such as the peculiarities of deletion in linear probing, the pros and cons of different collision resolution algorithms, and the actual time complexity of Hash Tables.
There are many more aspects to discuss regarding Hash Tables, such as comparing the performance of different hash functions, empirically comparing the performance differences of various collision solving algorithms, and exploring algorithmic performance beyond the tombstone mechanism in linear probing. These topics are left for future exploration.
Chinese Version Below
最近我在重新学习 Rust,正好在阅读《Crafting Interpreters》这本书时实现解释器。在阅读 Hash Table 的实现章节时,发现 Hash Table 的实现中有许多有趣的小细节,因此写下了这篇博文,使用 Rust 实现一个 Hash Table,并进行一些可能不太标准的基准测试。
Hash Table一般由两个部分组成:
- 哈希算法
- 碰撞解决算法,常见的包括: a. 链表 b. 线性探测(linear probing)
我们的 Hash Table 使用 String 作为键类型,采用一种足够简单的哈希算法,称为 FNV-1a,来计算其哈希值。为了避免每次查询时都重新计算哈希值,我们提前计算并将其缓存在键中。
pub struct KeyValue {
    key: Key,
    value: Value,
}

pub struct Key {
    name: String,
    hash: u32,
}

impl Key {
    pub fn new(name: &str) -> Self {
        let mut hash: u32 = 2166136261u32;
        for &b in name.as_bytes() {
            hash ^= b as u32;
            hash = hash.wrapping_mul(16777619);
        }

        Self {
            name: name.to_string(),
            hash,
        }
    }
}

pub enum Value {
    Boolean(bool),
    Number(f64),
    String(String),
}
一个 Hash Table 需要一个数组作为存储空间,同时还要记录数组当前存储了多少数据,以便在数组空间接近满时进行扩展。
pub struct Table {
    pub count: usize,
    entries: Vec<Entry>,
}

pub enum Entry {
    KeyValue(KeyValue),
    Tombstone,
    None,
}
entries 是实际存放数据的数组,数组元素是一个 enum,有三种可能:第一个表示存在数据,第二个表示数据已被删除,第三个表示不存在数据。Tombstone 是实现 Hash Table 删除操作的一种常见技术。如果 Hash Table 使用链表来解决碰撞,删除操作会很简单,只需删除链表中的对应元素。但为了降低 CPU 缓存击穿的概率,我们采用了线性探测来实现。
与链表不同,在发生碰撞时,线性探测在数组上向后寻找第一个可用的空间来存放元素。在查找时,如果在目标位置找不到目标键,会不断依次向后查询,直到遇到空元素或找到目标键。
然而,线性探测的删除操作相对较难实现。想象一下,如果我们简单地删除一个元素,就会引入一个空元素,这可能打断其他键查找的“链条”。墓碑(tombstone)是解决方案之一,通过将待删除元素替换为一个墓碑,查找操作在遇到墓碑时会继续向后查找,从而不会打断“链条”。而插入操作遇到墓碑时则直接替换,这样也避免了空间的浪费。
在实现插入、查找和删除之前,先定义一个帮助函数 find_entry,它负责查找指定的键。如果找到,返回对应的索引;如果找不到,返回可插入的索引。可插入的索引可能对应一个空元素,也可能对应一个墓碑。
enum FindResult {
    Found(usize),
    Available(usize),
    Tombstone(usize),
}

fn find_entry(entries: &Vec<Entry>, key: &Key) -> FindResult {
    let mut index = (key.hash % entries.len() as u32) as usize;
    let mut tombstone: Option<FindResult> = None;

    loop {
        match &entries[index] {
            Entry::KeyValue(kv) => {
                if kv.key == *key {
                    return FindResult::Found(index);
                }
            }
            Entry::Tombstone => {
                if tombstone.is_none() {
                    tombstone = Some(FindResult::Tombstone(index))
                }
            }
            Entry::None => {
                if tombstone.is_some() {
                    return tombstone.unwrap();
                }
                return FindResult::Available(index);
            }
        }

        index = (index + 1) % entries.len();
    }
}
接下来,我们来实现查找操作 get。既然我们已经有了 find_entry,实现查找操作就变得非常简单。
impl Table {
    pub fn get(&self, key: &Key) -> Option<Value> {
        if self.entries.len() == 0 {
            return None;
        }

        if let FindResult::Found(entry_index) = find_entry(&self.entries, &key) {
            if let Entry::KeyValue(kv) = &self.entries[entry_index] {
                return Some(kv.value.clone());
            }
        }

        return None;
    }
}
插入操作 set 相比查找稍微复杂一些,因为插入时可能会遇到数组空间不足的情况。为了提高性能,我们不能在空间几乎满时才扩展空间,因为随着可用空间的减少,碰撞的概率会越来越高,查找操作的耗时也会随之增加。因此,我们设定一个 MAX_LOAD,表示当已使用空间达到指定比率时就该扩展空间。
这里定义另一个帮助函数 adjust_capacity,用于扩展空间。在函数内部,我们首先申请一块更大的空间,然后遍历原始空间,依次插入已有元素。
impl Table {
    fn adjust_capacity(&mut self, capacity: usize) {
        let mut entries: Vec<Entry> = vec![Entry::None; capacity];

        self.count = 0;
        for e in &self.entries {
            if let Entry::KeyValue(entry) = e {
                if let FindResult::Available(index) = find_entry(&mut entries, &entry.key) {
                    entries[index] = Entry::KeyValue(entry.clone());
                    self.count += 1
                }
            }
        }

        self.entries = entries;
    }
}
有了 adjust_capacity 后,我们来实现 set 操作。首先检查插入后空间是否超过阈值,如果超过,则扩展空间(这里我随意选择一个策略:当小于 8 时直接扩展到 8,否则按两倍扩展)。然后利用 find_entry 告诉我们可以插入的索引。Found 表示已存在对应键,直接更新;Available 表示不存在对应键,存在可插入的空元素,因此我们递增元素数量 count,然后插入;Tombstone 表示可插入的墓碑,此时我们将墓碑视作已有元素,不递增 count。因为如果我们不把墓碑视作已有元素的话,当数组全是墓碑没有空元素时,find_entry 会陷入死循环。
impl Table {
    const MAX_LOAD: f32 = 0.75;

    pub fn set(&mut self, key: &Key, value: &Value) {
        if (self.count + 1) as f32 > Self::MAX_LOAD * self.entries.len() as f32 {
            let capacity = if self.entries.len() < 8 {
                8
            } else {
                self.entries.len() * 2
            };

            self.adjust_capacity(capacity);
        }

        let index = match find_entry(&self.entries, &key) {
            FindResult::Found(index) => index,
            FindResult::Available(index) => {
                self.count += 1;
                index
            }
            FindResult::Tombstone(index) => index,
        };
        self.entries[index] = Entry::KeyValue(KeyValue {
            key: key.clone(),
            value: value.clone(),
        });
    }
}
有了墓碑机制,实现删除操作就变得比较简单,只需将对应元素替换为墓碑即可。
impl Table {
	pub fn delete(&mut self, key: &Key) {
        if self.count == 0 {
            return;
        }

        if let FindResult::Found(index) = find_entry(&self.entries, &key) {
            self.entries[index] = Entry::Tombstone;
        }
    }
}
到此,一个完善且可用的 Hash Table 就实现完成了。接下来让我们进行一些基准测试。
我定义一个操作为插入一定数量 n 的元素,然后删除 n/10 的元素,最后查询 n*200 次,计算每次操作的平均耗时。
可以得到以下结果,其中 x 轴表示元素规模 n(n = 10..1500),y 轴表示当前规模下的平均操作耗时。可以看到,平均耗时随着规模呈锯齿状波动,每一个上升区间代表在数据空间大小固定的情况下,操作随着 Hash Table 已存储元素的数量增加而增加(也就是说,碰撞次数越来越多)。当达到阈值时,空间被扩展,操作的平均耗时随之回落。
另外,我还计算了摊余(amortized)操作时间。同样,x 轴表示输入规模,不同的是,y 轴表示目前为止所有规模的操作平均耗时。可以看到 Hash Table 的摊余时间复杂度确实接近 O(1)。
通过这次的实现,我了解了 Hash Table 中一些特别的细节,比如线性探测下删除的特殊性、不同碰撞解决算法的优缺点,以及 Hash Table 的实际时间复杂度。
关于 Hash Table,还有许多可以讨论的地方,比如比较不同哈希算法的性能、实际比较不同碰撞算法的性能差异,以及线性探测下墓碑机制之外的算法性能,这些都留待未来探索。
希望这篇博客能够对你有所帮助!